Trojan Remover Help

Manually Adding Scheduled Update Tasks

Hide Navigation Pane

Manually Adding Scheduled Update Tasks

Previous topic Next topic  

Manually Adding Scheduled Update Tasks

Previous topic Next topic JavaScript is required for the print function Mail us feedback on this topic!  

Trojan Remover is configured to check for updates daily. You can enable/disable this update check, and set the preferred time for the update checks, by selecting Settings | Update Settings in the main Trojan Remover program.


If you want to check for updates more frequently than Daily, then you can manually create additional Scheduled Tasks to do this. Here are the detailed instructions you will need:


Windows Vista/Windows 7/Windows 8/Windows 10

On Vista and Windows 7, open the Windows Task Scheduler by going to: START > Control Panel > System and Maintenance > Administrative Tools, then double-click "Task Scheduler" (if User Account Control is enabled, you will see a UAC elevation prompt).


On Windows 8, on the Start screen, type "schedule" (without the quotes) and click on Settings, then click on Scheduled Tasks.

On Windows 10 click Start and type "schedule" in the empty box then select Schedule Tasks from the results.


When the Task Scheduler screen appears, in the "Action" box on the right-hand side click on Create Basic Task....


On the screen that comes up, type in a useful name and description for the task (we use "Trojan Remover Scheduled Updates", and "Automatically checks for updates at the selected date/time"), then click the Next button. On the next two screens, select when you want the Updater to run. When scheduling the updater, ensure you choose a time when you know the PC will be running and connected to the Internet.


On the next screen, in answer to the question "What action do you want the task to perform?", select Start a program, then click the Next button.


On the "Start a Program" screen click on the Browse button. A window will open allowing you to browse for a program. Go to the directory that Trojan Remover is installed in (C:\Program Files\Trojan Remover by default on 32bit systems, C:\Program Files (x86)\Trojan Remover on 64bit systems) and double-click on trupd.exe (or just trupd, if you have the option to hide known file extensions enabled in Windows Explorer). This will place the full path to the filename into the "Start a Program" screen, looking like:


"C:\Program Files (x86)\Trojan Remover\trupd.exe"


Of course it may differ on your PC if you have installed Trojan Remover to a different directory.


Next, in the "Add arguments (optional)" box, type /silent - this ensures that the Updater works without requiring prompting. Here's a screenshot:
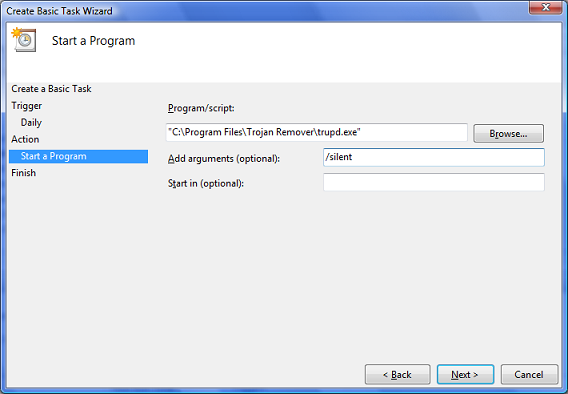
taskwiz


Click the Next button. On the last screen, check the box labeled 'Open the Properties dialog for this task when I click Finish', then click Finish. In the Properties screen that appears, on the General tab, check the box labeled 'Run with highest privileges', then click OK. The task is now scheduled.


Windows XP

Open the Windows Task Scheduler - START > All Programs > Accessories > System Tools > Scheduled Tasks. Double-click on 'Add Scheduled Task'. This will start the Scheduled Task Wizard. Click on the 'Next' button. In the screen that appears, click on the 'Browse' button. Browse to the directory where you installed Trojan Remover (C:\Program Files\Trojan Remover by default) and double-click on the trupd.exe program. In the next two screens select the days/times you want the automatic update check to be carried out. It is important to select a time when you are fairly confident that the PC will be connected to the Net. The Updater cannot start its own Internet connection so the PC must already be connected.


If you are on XP or later, you may be asked to also input your User Account password.


In the final screen, place a checkmark in the box labeled 'Open advanced properties for this task when I click Finish'. Click on the 'Finish' button. In the screen that comes up, look at the box labeled 'Run:'. In here you will see the command that has been set up to run the Updater.


Click your mouse inside this box so that you can edit what is there. Move to the end of the line and add the following parameter, preceded by a space:


/silent


The line should then be similar to:


"C:\Program Files\Trojan Remover\trupd.exe" /silent


Of course it may differ on your PC if you have installed Trojan Remover to a different directory.


Once you have edited the line correctly click on the 'OK' button - the task is now scheduled.


When the scheduled automatic update is started, it will silently attempt to contact one of the update servers (chosen randomly). If a Database update is found, the Updater will attempt to silently download and install it, without requiring User intervention.


If a Program Update is found, the normal Updater screen will be displayed allowing you to manually proceed with the update, or cancel it.


If no update is found, or a connection could not be made, a note will be added to the Update logfile. This logfile can be viewed in Trojan Remover by selecting 'Help > View Update Log'.


** IMPORTANT**

For the Updater to be able to connect to the update website, the PC must be connected to the Internet when the Updater runs. Also, you must ensure that any firewall you have installed is configured to allow the Updater program trupd.exe to connect to the Net.


** NOTE FOR WINDOWS XP USERS **

If the User account you use to schedule this task does not have a password assigned to it (i.e. the password is blank), then you will need to make a system modification to allow scheduled tasks to be run. This is what you need to do:


For Windows XP Pro

Click START > Control Panel. Double-click on Administrative Tools. Double-click on Local Security Policy. In the left-hand pane, navigate to Local Security Policy > Security Settings > Local Policies > Security Options. In the right-hand pane find the option labeled 'Accounts: Limit local account use of blank passwords to console logon only'. This policy is enabled by default - right-click on it, and select Properties. Change it from Enabled to Disabled.


For Windows XP Home

You will need to manually modify the Windows Registry. WARNING: serious problems might occur if you modify the registry incorrectly. If you are not familiar with using Regedit, contact us for further advice.

Using regedit, navigate to the following registry key:

HKEY_LOCAL_MACHINE\SYSTEM\CurrentControlSet\Control\Lsa


You should see a value labeled limitblankpassworduse, set to 1. Modify this value, changing the 1 to 0 [zero].